Thursday, December 27, 2012

One super cool industrial style pub table

For Christmas this year my wife and I decided to make our son a dinning room table. He's twenty so it had to be something exceptionally unique, modern, and with an urban industrial flair. I'm not sure what all that means but we think it translates to our final product below one super cool pub table.

final product


Stage 1, the materials list is under $100 bucks (without stools) and can be purchased @ Homedepot:
  • 6ea. 2"x4"x8' (for project structure)
  • 3ea. 2"x10"x8' (for table top)
  • 1ea. 1"x4"x12' (for foot pads and additional spacer's on the bottom and top of legs for detail)
  • 1ea. 4"x4"x6' (for cross brace between legs)
  • 16ea 1/2"x3 1/2" lag screws and washers
  • 3 1/2'deck screws
  • 1 5/8" course drywall screws
  • 2ea. 3/8"x8" carriage bolts with nuts
  • 2ea. 1/2"x6" lag screws with washers
  • 2ea. 10"x10' aluminum flashing (the thinner the more pliable)
  • 2 boxes of 1 1/4" aluminum nails (for rivet effect)
  • wood glue
  • wood filler
  • stain (we used ebony)
  • Stools purchased @ http://www.overstock.com/Home-Garden/Tabouret-30-inch-Metal-Barstools-Set-of-2/3879161/product.html

Stage 2, cutting out material. All cuts are either a straight 90deg or 45deg and specified below. As with any custom piece of furniture the dimensions can be tailored to your specifications. We're making our table to an over all height of 40" and using 30'" stools. What ever dimension you choose a comfortable height from your leg to the table is between 8-10".

Cut:
  1. 4ea. 2x4's @ 32 1/2" straight 90deg.
  2. 4ea 2x4's @ 36" with 45deg at each end
  3. 4ea 1x4's @ 36" straight 90deg.
  4. 8ea 2x4's @ 18" with 45deg at each end
  5. 5ea 2x10's @ 47" straight 90deg.
  6. 4ea 1x4's @ 3 1/2" squares
  7. 1ea 4x4's @ 24" straight 90deg.
stage 2, the cut out

Stage 3, After you have all your material cut out it's time to start laminating all the right pieces together. 3a, The first thing you'll need to laminate (glue) together is your two uprights (the 4pcs @32 1/2") . 3b, drive a few deck screws into the uprights to hold together while being glued (screws will stay in). Set the uprights aside to dry and start on the tops and bottoms. 3c, laminate the tops and bottoms (the 1x4's and the 2x4's @ 36" with the 45 deg cut), the bottom will have one additional step the pads (the 1x4's @ 3 1/2" squares. As in 3a, drive a couple of screws (1 5/8 course drywall) to hold while glue dry's. Be sure to drive the screws in through the 1x4 first.

stage 3a, gluing the uprights together
  
stage 3b, secure the pieces with deck screws in a couple of places
3c, this is the bottom assembly (top assembly's the same without the pad as shown here)


Stage 4a, square uprights with the bottoms. Stage 4b, glue and drive a couple of 3 1/2" deck screws through to help attach. Stage 4c, is the same as both 4a and 4b but for the top.

stage 4a, squaring bottoms (4c top)
stage 4b, drive deck screws in to the bottom (4c top)
squared, glued, and screwed

Stage 5,  fill nail and screw holes, sand, and stain (2) uprights, (2) tops, and (2) bottoms (6pcs) in all. The project has to be stained at this stage prior to attaching the the cool rivet detailed angle pieces.


Stage 6, covering your angle supports with the aluminum flashing. 6a, Cut out flashing a few inches longer than each support (this will allow for enough material to fold under and out of sight when attached. 6b, fold and secure flashing to your supports with a hammer and aluminum nails (this is rather time consuming but is one of the most important steps) about every 3/4"-1" add a nail along sides, top, and bottom of supports. The result is a pretty cool and effective way to replicate rivets.

stage 6a, cutting flashing
stage 6b, folding and nailing the flashing

Stage 7, attaching the cool rivet angle supports. Pre-drill a 1/2" hole at the end of all 8 angle supports. This makes attaching them to your uprights, bottoms, and tops much easier.

stage 7, pre-drill 1/2" holes for ease of installation
stage 7, all supports attached

Stage 8 (OOps I didn't get a picture of this stage, sorry).  Making the table top surface. Take the 5pcs of 2x10's cut to 47" and lay them out on a flat level surface and square off the ends. When surface is square find center and mark it. Once center is determined measure 12" out from both sides of center and mark (do the exact same on the other end of table top) scribe a line from mark to mark. You now have a straight line to follow when installing the last two pieces of 36" 2x4's (they should run perpendicular to the 2x10's). With a deck screw attach in two places on each 2x10 should be a minimum of 20 screws (you want the outside dimension of the 2x4's to be 24").


Stage 9, adding the 4x4 center support and top to your table. in order to do this step and have a level finished product you need to have a level surface. For this step we brought the project in to the house on our level tile floor. Determine the height of the 4x4 cross member (center of angle supports make good sense for me) Pre-drill 1/2" through holes on center and attach with the (2) 1/2"x6" lag screws one at both ends.

Now, with help take your table top and set between the uprights. Check for level (if level that's awesome) chances are you will have to shim and adjust as I did. If this is the case door shims work really well. once level you will need to stabilize with clamps or something of the sort. Once clamped and stable drill a 3/8" through hole from the outside of top support to the inside 2x4 table top support. Do the same on the other side opposite end. Add 3/8x8" carriage bolts and tighten this secures the top to the framework.

stage 9, adding 4x4 support and table top

Stage 10, sanding and staining the table top. After sanding blow off the entire project and wipe it down with a mildly damp rag. Then start staining. Be careful when doing this final step of staining. If you get any drips where there shouldn't be wipe off ASAP with a rag on the wood area's and mineral spirits on the aluminum area's.

stage 10, final sand and stain

All done one super cool industrial style pub table!!

Time to order chairs... (link above)


Friday, December 21, 2012

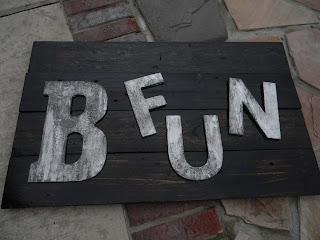
A reminder to "B fun"

A couple of weeks back we did a tutorial on how to make scrap wood look like 120 year old re-finished barn board. in that demo we made a simple sign out of fence boards distressed them a bit and finished them off. You can find the how to post in the blog "120 year old refinished barn wood floors or not?"

That demo is the bases of this project a sign when you walk in our house as a reminder to "B fun"!

finished product

Stage 1, after you have decided what your projects backdrop is going to be (I've seen words and letters stuck on the wall and it looks pretty cool too) and found or made the letter font for your project you will need to lay it flat on a sheet of aluminum foil. With an exact-o knife cut out each of the letter's and set to the side (you'll need them shortly but don't want them to get messed up).

stage 1, cut out each letter

Stage 2, with ModPodge you want to start edging all your letters with foil. The more detailed a letter the more difficult it is to edge out. Coat enough on both sides and edge with Podge, cut strips of foil, and start edging the letters out.

stage 2, edging with foil

Stage 3, once letters are all edged it's time to put on the foil facings of your letters. Podge the top side of the letter then carefully lay down the foil letter. The crinkles are kinda cool looking and help authenticate a nickel look so I go with them.

stage 3, foil facing out the letters

Stage 4, using a dark grey acrylic paint and a 1" foam brush paint letters front and sides. Don't worry about the backside it's a sign you wont see it.

*Tip that I learned; only paint out one letter at a time because the paint drys to quickly for the next step.

stage 4, painting on the grey

Stage 5, before your paint drys lightly and evenly wipe off the paint from letters. Leave paint in creases it really kicks up the faux look to actual metal.

stage 5, wipe off paint and get a nickel effect

Stage 6, after letters are dry enough to attach play with layout. When you find the layout you like cut out some spacers to help give more dimension to you project. Layout below has no spacers behind the letters and looks a little flat and simple.

stage 6, layout and spacers

Stage 7, attach letters to spacers with a good wood glue let dry. Then attach letters to sign with wood glue or pneumatic gun (just make sure the nails or staples aren't too long).

Now hang it, give it, sell it, whatever...

stage 7, attaching spacers and letters


This is really fun and affordable project that's a self reminder to myself and to all who enter our house to "B fun!"

Thursday, December 20, 2012

The kicked Up ceiling fan

Several years back we bought a ceiling fan for our great room. The fan was nice but kinda simple looking. I've been racking my brain a bit as to what to do with dressing it up a bit. After several idea's and no execution I was getting stumped.

Until today it hit me let's go drum or barrel style and make a fun but funky "kicked up ceiling fan."

finished product

Stage 1, assessing what will and what wont work. Our fan has a light kit that's attached by three adjustable clamps (you'll see what I mean further in this tutorial). This galvanized tub has that cool looking barrel lamp look that I'm going for, of course with a rustic twist.


stage 1, assessing what can work

Stage 2, take off existing light fixture and get a measurement of the diameter you're going to need. The glass fixture to my fan was attached in three places, after removing get the diameter that's required for your new fixture (mine was about a 9"dia). This will allow my new fixture to slip over the lights and mount flush to the three adjustable clamps.

stage 2, out with the old in with the new

Stage 3, now that I know a 9" diameter is whats needed find something that has that dimension (my wifes mixing bowl will do). Trace out with a sharpie.

stage 3, trace out your diameter

Stage 4, drill a couple of starter holes that will allow you to start snipping out the diameter.

stage 4, drill starter holes

Stage 5, with a set of metal snips follow your diameter and cut it out.

stage 5, just snip it

stage 5, all ready

 Stage 6, give it some WOW factor. Take a crayon and draw free flowing scrolls all around the tub diameter.
stage 6, drawing scrolls

Stage 7, set yourself up with a little jig that will allow you to punch through the sides of your scrolls with a 16nail and hammer. This step takes time but will be well worth what you put into it.

stage 7, blinging it

Stage 8, getting it ready to mount. The tub already has a seam at the bottom that can be held by the fans adjustable clamps. But for safety sake mark where each of the clamp contact points will be and flair them out with a pair of channel locks.

stage 8, flaring
stage 8, looking at the clamps where the flared edge is held

Stage 9, insert your old fixture cover if it fits and secure it with a couple of screws.

stage 9, inserting the old light cover

stage 9, holding it in with a couple of screws

Stage 10, using 100% silicone re attach your finials to the bottom of the light fixture and let sit to dry.

stage 10, attaching the finial

Stage 11, hang that bad boy!! This can take two people and make sure you test fit making sure everything is going to fit as planned.

stage 11, hanging that bad boy

Now turn on the light, turn on the fan, stand back and give it a test run.
Bam, another custom one off piece that makes it's own statement.


Wednesday, December 19, 2012

Big style art work from scrapbook paper

Years ago my wife and I made and sold handcrafted signs. Our key ingredient Mod Podge it's pretty cool stuff.

Any how after 100's of signs and a little bit of podging experience here's an inexpensive way to get a really cool designer art piece using scrapbook paper, ModPoadge, MDF, and a few other things.

finished project


Stage 1, cut your 1/2" mdf into 12"x12" squares (table saw works best but other saws can work as well). If your nice to the guy in the lumber department he'll probably hook you up and cut them for you. The number of squares will depend on your project size. I'm using 12 and going BIG!! 12pcs will require a 3x4' backer board, cut this out also at this stage. Say you only want 3 squares than an 8"x3' backer works good.

stage 1 cutting the 12" squares

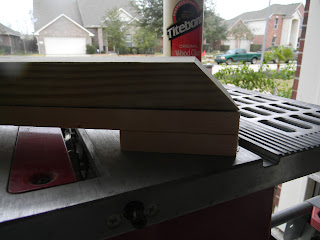
Stage 2,  for every square you make you'll need a spacer block (don't skip this step because it adds the needed dimension that distinguishes a designer look. Using a 2x4 cut as many squares needed.

stage 2, cutting spacers

Stage 3, rough sand the edges of your spacers so they paint easier and look nicer.

stage 3, sanding edges of spacers

Stage 4, lay out the project for paint. I use flat black for lot's of my projects (this one's no exception) it's a go to paint for me so I always have a gallon on hand. When painting the 12" squares don't forget to paint the sides. The spacers only need the sides painted (you wont see the other area's). Also, paint your backer board also at this stage.

stage 4, painting out the project

Stage 5, cut out your desired scrapbook paper into 12"x12" squares. You can also use wall paper instead giving your piece a more subtle designer look. I'm going bold with lot's of pattern and texture.

stage 5, cutting scrapbook paper into 12" squares


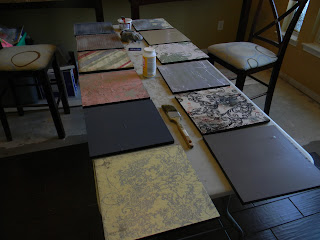
Stage 6, after your painted mdf squares have dried it's time for Modpodging. Coat the top surface with podge using a cheap 1" foam brush, let sit a minute, then add your paper. Spread out paper with a credit card or something like that so your sure to get a flat good adhesion product. Next brush the sides with Podge to create a good seal and to minimize lifting. Let sit for a few moments to dry, then Podge the top of your squares and lay out to dry.
 
stage 6, ModPodge time

Stage 7a, adding a bit of bling if desired. If you choose this stage wrap a few of your 12"squares with aluminum foil (sides as well). ModPodge works well for adhering the foil to your squares. Let sit for a few moments to dry.

stage 7, adding bling

Stage 7b, paint the entire foiled surface with a dark grey acrylic paint sides and all.

stage 7b, painting foil

Stage 7c, before the paint dries get a clean rag and wipe off.  Be sure to wipe lightly and evenly leaving behind paint in the creases. 

stage 7c, wiping off paint creating a cool nickel effect

Stage 8, polyurethane a top coat over all your finished 12"squares. This really gives the project a nice high end look so be sure not to skip. Allow the proper time for squares to dry.

stage 8, polyurethane the squares

Stage 9,  it's time to glue on the spacers (Be sure to use a high quality wood glue). A quick and easy way to find center in a square is to use a straight edge. Diagonally go from corner to corner and scribe the line. Put glue on your spacer and set each corner on the "X" line. 

stage 9, adding the spacers

Stage 10, lay out all your squares on your backer board. Use temporary cheat spacers like shown below to help you get the straight lines that are needed for this project to have some wow factor. Find center on your backer board and start with the middle square and work your way around. It can be eyeballed but it takes more effort and the results aren't as good. There's a couple of suggested ways to adhere the squares. If you have a nail gun use it because its easiest. If not be careful and individually glue each piece.

stage 10, laying out the squares

Stage 11, remove all your temporary spacers. If you nailed with a gun your projects just about ready to be hung. If glued let it sit for at-lease 24hours before moving on. When ready to hang find center of mdf backer board and drill a through hole about 3" from edge. This will allow a single anchor (deck screw) in the stud to hold the piece balanced and level. It's heavy and will take two people to move. Remember not to grab or carry by 12" squares handle only by backer board.

stage 11, to hang or not to hang


I love the look of this big, high style, designer diy piece, NICE!!