Tuesday, December 18, 2012

Super cool stump + scrap metal = ART

A few weeks back a came across some really cool stumps off the side of the road. One we turned into an end table and the second was going to be a really unique chair. We had to scrap the chair idea after my stump had a week area and split.

Man, what a bummer... O well no point in fretting at the "could of" we have a really cool stump to do something with.

I'm thinking let's showcase the inside of this thing by making it into a super cool art piece!!

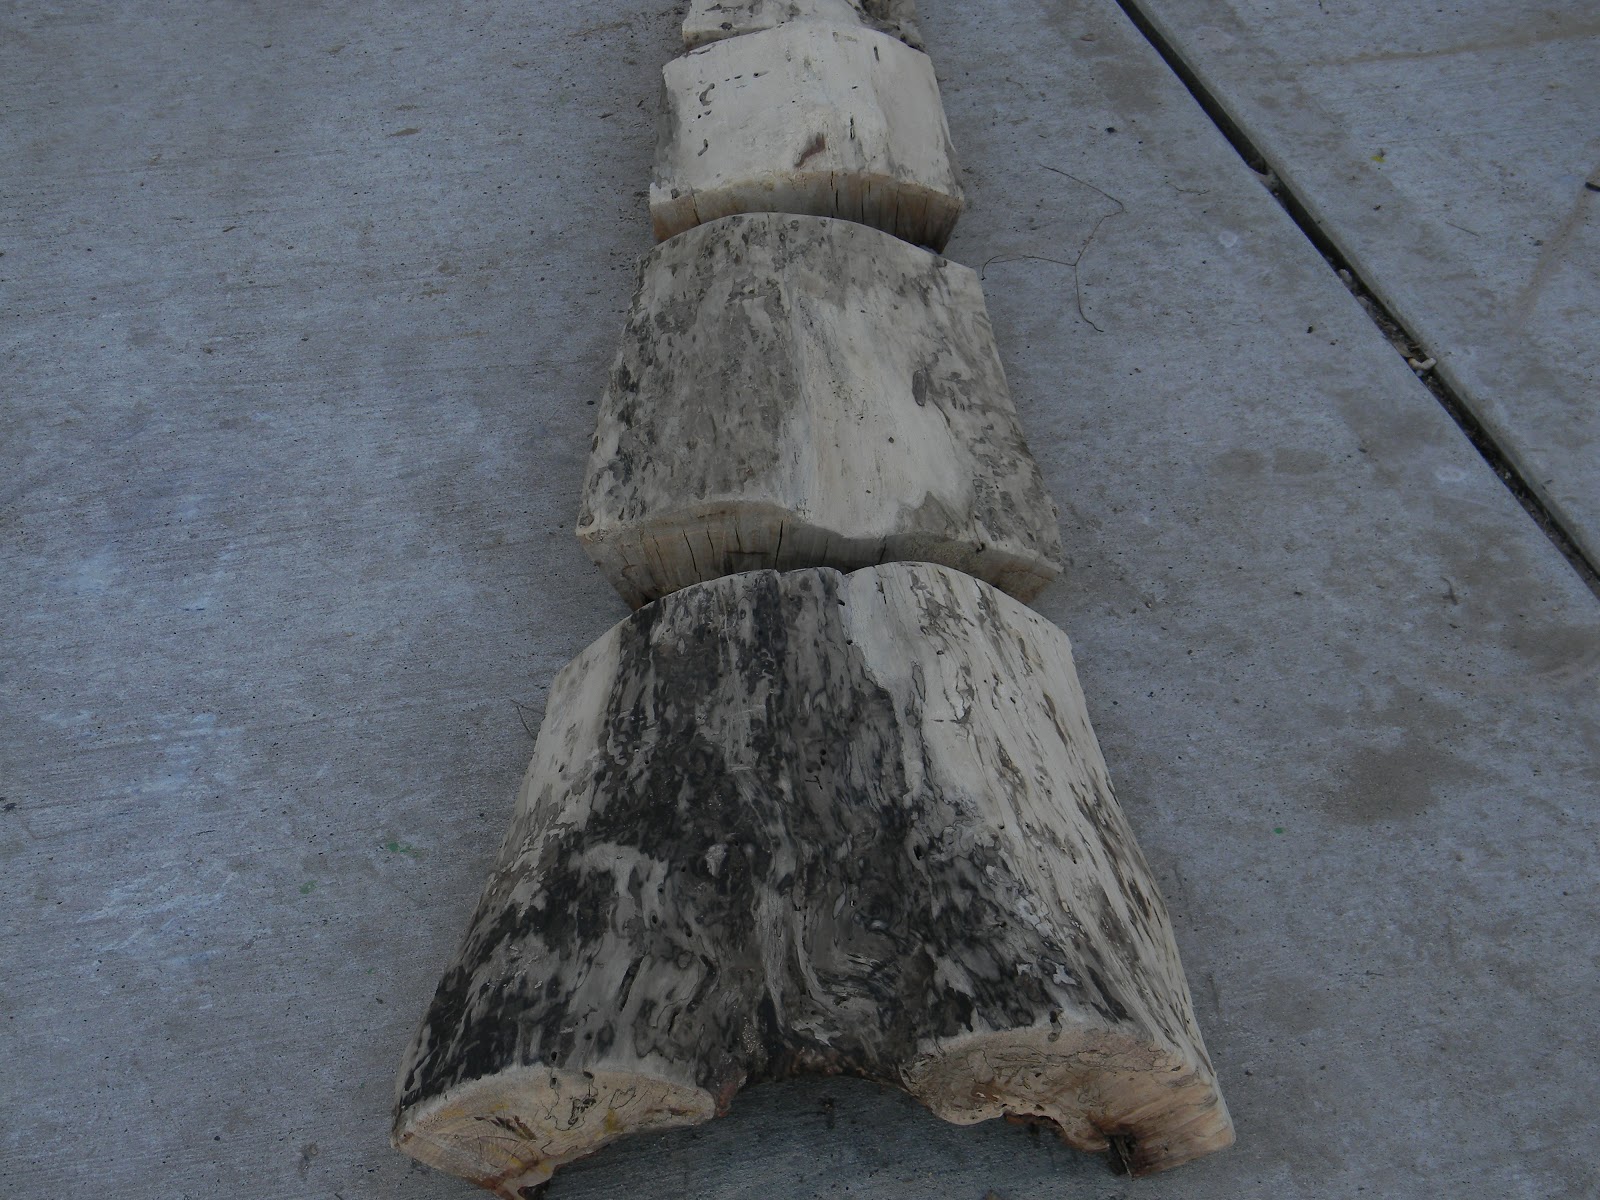
 looking at the inside of our project
 
Stage 1, sectioning the piece to have an organic flow. With a chainsaw section your piece to mimic the flow you want. I was going for a trunk look, larger at the bottom with a slight taper. You don't have to have a hollow stump to do this it will just take more cutting with a chainsaw (you may consider showcasing either side per your preference).

stage 1 laying out an organic flow

Stage 2, finding your material to space your sections of stump. I had a scrap aluminum awning that someone was throwing out years ago, so I used that, and cut it into 12" lengths. 3/4" Galvanized pipe in 12" lengths would work and look great also (probably better since it's round).

What ever material you use make sure it's strong enough to support the sections of stump.

stage 2 cutting out my spacers

Stage 3, the amount of spacers needed depends on how many sections your piece will be. I needed six total pieces (2) for each section. I like the look of aluminum when sanded so I sanded it with a rough 60 grit paper. Had I used galvanized pipe I would of left the finish as is.

stage 3 scuffing up my 12" spacers

Stage 4, my spacer stock was 1 1/4" at the widest point; using a hole saw with the right diameter to give  a tight fit start drilling out holes. Hole saw bits will allow you to go only so deep, then you have to chip out what you just drilled and start again. You need a depth of about 4" per hole.

I prefer the look of clean lines. To get all your spacers lined up treat each section individually and mark drill holes by laying out the project like stage 1 pic.  Drill your two holes and align with the next section of stump.
 
stage 4 drilling spacer holes

Stage 5, after test fitting your spacers fill each hole with a premium construction adhesive. Insert spacer and pound it in (don't pound directly on spacer surface use a scrap 2x4 as a buffer so you don't damage spacer ends). Work your way from bottom to top until project is done.

stage 5 filling holes with a premium construction adhesive


Stage 6, finish or not to finish that is the question? Finishing stumps with poly really makes the piece look fantastic. Do whatever you want. I'm leaving this one unfinished going for a "more organic look" showcasing the veining on the inside. But both sides look really good.

stage 6 the finished product

This project was nothing more than a project gone bad with the addition of some scrap metal. As the saying goes "art doesn't have to match the couch."


Monday, December 17, 2012

Crazy simple jute and button bracelets

While perusing Pinterest my wife came across this really cool bracelet made of old buttons and wax string. Ever since she's been on me to turn it into a family project.

I'm thinking a project that would help reduce her massive collection of old buttons might be a pretty good thing.

So here it is our version; a simple, fun, and actually pretty cool looking bracelet project:

jute and button bracelets


Step 1, cut a piece of jute about 18" long and tie a hoop knot in the middle. The hoop is used for a clasp to hold the bracelet around your wrist (so make sure it's just the right size).

step 1 hoop knot for clasp

Step 2, make another knot about 2" from the hoop knot (this knot will keep your button in the right place while wearing).

step 2 knot two
Step 3, for ease tape the end of the jute so it can be fed through the button holes. In some cases you may have to enlarge the holes of your button, just use the appropriate size drill bit.

step 3 tape end of jute
 Step 4, feed (one or two strands) of the jute through the button hole. In the illustration I only fed a single strand through the button.
stage 4 feed the jute through the holes

Step 5, pull the jute tight and make a third knot just on the other side of button (when around your wrist the button should be centered like a watch).

step 5 backside / third knot

Step 6, adding the final clasp button piece. Again feed a single strand of jute through the button hole, allow enough material to wrap your wrist, tie off at the end, then cut off excess jute.

step 6 adding the clasp button and the final knot

About 5 minutes later that's it (pretty simple and kinda cool looking)!!

finished product

This is a "crazy simple' fun family project that has enormous Christmas gift potential...


Friday, December 14, 2012

the vintage box no-mas

Something that's a lot of fun and I love doing is perusing antique stores. Although I'm not a huge fan of traditional antiques. There's always a vintage piece, not too pricey, that can take on an entirely new purpose.

Last weekend we went perusing... my find a vintage box that was 20% off, NICE!

So what are we going to do with it? I'm thinking a well traveled off the hook bar stool.

finished product

Getting started:
stage 1 the vintage box find

The first thing that needs to happen is to construct a simple frame that will support the weight of anyone who sits on it. In this case I used 2x6 material (2) pieces laid on the bottom and (4) cut to the same length as upright supports about 3/4" below the top of the box (this will allow my seat to locate correctly).

stage 2 simple frame for good structure

Choose or make a leg style for the project and per-drill anchoring holes. Typical stool height is 24"-28" high so make sure the combined leg and workpiece don't exceed your preferred measurement.

In this shot you're looking at the upper right corner of the box (notice the 1/2" x 6" lag screw and washer this is what anchors your leg). The 2x6's laid in the bottom are crucial for structure, otherwise your legs will be wobbly and the chair unstable.
 
stage 3 how to secure the legs

This photo illustrates the seat structure and all the legs attached. As typical with me the piece has a modern 15deg cut to achieve the flaring effect.

stage 4 seat structure and legs attached

The backrest also needs some simple structure for support. In this case I used a 2x4" cut to length and then ripped (split) it up the middle. It's recessed about 3/4" from box edge (this allows for the backrest to locate) attached with course drywall screws through the side.

stage 5 backrest structure

Now it needs the seat and backrest. Using mdf cut two pieces to the projects inner dimension. In this case the project had a true rectangular shape making the cuts simple. I've seen this done to vintage luggage and it looks really cool. But remember structure is essential for making a functional project.

stage 6 the overall project

Because the box or luggage used in the project wasn't intended to be a chair you will need to make a dead stop and attach it to the back. My stop was a simple piece of 2x4" secured with (2) deck screws through the box into the stop and I added a rubber bushing at top (this allows the backrest to have support and a fixed position).

stage 7 the dead stop

Finish your project stain, paint, whatever the preference. Just use the proper technique for the application. I chose a stain and polyurethane for mine and used a couple of coats with a light sand between. You can finish the legs before attaching them if preferred. I personally like the position their in attached.

stage 8 finishing legs

Every comfy chair needs a good cushion. A used piece of memory foam is just perfect. I've found when working with foam material an electric knife is the only way to go, it cuts through the material clean.

stage 9 cutting foam seat and backrest

First, attach the foam to your mdf with spray adhesive. It will make attaching the material much easier.

Second, A unique cool piece like this needs fun and unique material for its upholstery. I'm thinking Faux cheetah will work nicely. Use whatever the only prerequisite make it FUN!!

Cut material so you have sufficient length all around to wrap and staple.

stage 10 putting your stamp on it

BAM!! It's about done attach the seat and backrest and step back. Now sit on it and try it out. This last step is for comfort (make adjustments where necessary/ if necessary).

stage 11 stand back and try it out

This project like most was an absolute blast. From the perusing for the right piece with the family at the antique store through its development.

Reminder, structure is essential on a project like this to make it sound and functional, take a few moments and think it out...

In the end you'll have a one off conversation piece that was a blast to make.


Tuesday, December 4, 2012

120 year old refinished barnwood floors or not?

People are loving the vintage and rustic look of aged wood. I'm all for re-purposing and using the real thing if possible. But what if your like me and live in an area where you don't see people demolition 100 year old barns.

I say fake it then.

There's lot's of different methods for getting that perfect vintage/ rustic look for your next project.

Here's mine quick and easy.

For the sake of this tutorial I'm going to grab a couple of old pieces of fencing that have fading stain and are ready for the trash heap.

stage 1 trash heap fence boards

I'm making a frame for a sign project and it will work perfect to demonstrate this sought after aged look.

stage 2 the project sign

Now that I have a ready project surface to work with I want to sand the piece to get out the pronounce stained area's and uniform the surface a bit (rough sand 60grit).
 
stage 3 rough sand make it uniform

Now that my work piece is ready to go its time to love on it with a few things; hammer, chain, punch, screwdriver, bat... whatever beat it!!
 
stage 4 beat the piece

After loving on your work take a dark stain like ebony to accentuate the damage area's. Dapple a chip brush in the grooves, dips, and gouges then wipe off. As you see I wasn't concerned at getting all the ebony stain off. A little left makes the piece more aged.
 
stage 5 accentuate the damage

I love deep rich stains like dark walnut (that's what I stained this project with). Again with a chip brush stain your work and wipe off excess then let dry.

stage 6 stain project

At this stage there's two directions you can go. Direction 1; leave the piece more rustic and stop now. direction 2 (as shown) add poly and keep finishing. This is the first coat of poly, let it dry, lightly sand and re-apply poly as many times to achieve your desired look.

stage 7 keep finishing with poly

We're done. It's quick. It's easy and it looks vintage. 120 year old finished barnwood floors or trash heap fence boards...?

stage 8 the finished product

Again there's many different ways to fake it on your project. I say go for it, experiment, in the end whatever works for you.

Monday, December 3, 2012

Curbside score the no-longer bakers rack

Several weeks back my wife made an awesome curbside score, this great bakers rack. I was absolutely blown away that someone missed out on its potential.

The finish was perfect for a rustic re-purpose as it appeared to be neglected outside in the elements for a while.

But what... what do we need that would maximize the find?

stage 1 assessing the score


What about a hanging wall fixture or book case it already has shelves? Perfect a hanging bookshelf it is. The only modification this abandoned rack needed was to lose the bottom legs and well the rest is below.

stage 2 the execution

This curbside find found a perfect home in our up-cycled room. A room where we are challenging ourselves to decorate with mostly trash finds.

Side note: Be sure when doing this you use appropriate hardware in the studs to bear the weight.


Sunday, December 2, 2012

Stump-cycle

A few days ago my wife and I were driving around when she noticed a huge hollow tree stump off the side of the road. I didn't think much about it because we were in her car and couldn't pick it up anyway.

But, a couple days ago I was with my son and his girlfriend in her Jeep and we passed by the hollow stump again. This time we stopped and got that bad boy along with its friend a solid piece.

The wheels starting turning...

Anyway, this is the tutorial on the first project solid "stump-cycle end table."

The first step in this entire process is to make sure your stump piece is dry enough to work with. If it has rot no big deal it simply adds character to the project. You will need to decide to either strip off the bark, leave it on the stump, or perhaps a bit of both.

stage 1 the find and wheels spinning

Once your decisions made on the bark and your sure it's dry enough to work with its time to love on it with a course sandpaper 60grit makes quick work of excess dirt and rotted material. As with any wood project that's going to be finished work your way from course to smooth grit paper (I finish off with 150). Let the piece show off its character such as beetle grooves, rings, and such...

stage 2 loving on the stump

When all your sanding is done blow off your work. The piece is ready for its first coat of polyurethane (the type of poly depends on the use of the piece/ will it be inside or out). The first coat will be absorbed into your stump, let it dry, lightly sand, then re-apply second coat. After second coat dry's again lightly sand and apply a third coat. maybe even a fourth if necessary for your desired finish. The Legs are another area to be creative and anything will work if installed securely. I used a rustic 4x4 laying around and used the modern 15 and 30deg cut. The legs below are 8" long with a counter sink for lag screw head. Pre-drill or bore 1/2" hole through leg set it in location and drive a 10" lag screw to hold.

stage 3 poly and legs

The piece is just about done and starting to look fabulous. Now take a moment to Google what you just made a finished "stump end table." Are you kidding $400 and up!!

stage 4 finished product

One of my favorite projects for sure... a one off custom designer look for a couple of bucks NICE.


Saturday, December 1, 2012

The up-cycled tire

So this really great idea was passed on to me... how to make an ottoman out of an old tire. Being a motivated DIY'r I jumped at the chance to make one. From a picture I started gathering all the supplies needed. There wasn't a list of materials to refer too? Fortunately it was an easy project and could be figured out. You may want to put your own spin

Here's what I used:

  • 1 used tire
  • 300 ft of 3/8" sisal rope
  • a couple of scraps of MDF that will need to be cut to tire diameter.
  • 2x6 to cut legs out of
  • wood glue
  • course drywall screws 1 5/8"
  • and staples from my pneumatic gun (I hear super glue works)

stage 1 gathering supplies

 After you have everything you need you'll want to measure the tire diameter for mdf. The ottoman requires an upper top and a lower bottom support for the legs. The order is important be sure to install the bottom first because it makes installing the legs easier. I chose a modern leg style and cut them with a miter saw 15 and 30deg angles glued them and placed a couple of course drywall screws in each to secure. When securing the mdf use course thread drywall screws (anything over 1" in size works) you want the screws to pierce the tire.

stage 2 bottom first

 Installing the top will be just like the bottom (several screws around the diameter) secures it quit well.

stage 3 the top

 Here's where the project gets a bit awkward and I didn't have a picture to illustrate. You want to start running your rope from the bottom so flip it for ease. Once you covered the bottom sidewall and your working on tread a lazy Susan works nicely and eases the dizziness. My method of applying the rope was with pneumatic staples. I found a tire is a great medium for the gun to work with and you cant see the staples. Here's where others have used super glue but I'm not experienced to instruct how.

stage 4 roping

With the roping just about done finish the top of your project (I used flat black paint on top and the legs). Let whatever your using dry then finish out your roping up and over the mdf. I've seen it done with the entire top roped. But that makes an relatively inexpensive project quit pricey...

stage 5 the finished product
In the end I absolutely love this project but recommend finding the rope online where it can be found cheaper than a hardware store.


Have fun and make it yours!!